Showing posts with label Android Tricks. Show all posts

Tuesday, 30 August 2016

Send It Later: Useful SMS Scheduling Apps To Text At Just The Right Time [Android

SMS messages have become one of the most common forms of communication for friends, family, and even coworkers. They can also be extremely flexible with features such as scheduling and delivery reports. While delivery reports are usually included in stock SMS apps, scheduling is not. It would be great to have that ability, so you can easily send regular reminders to friends and coworkers, wish someone a happy birthday right at midnight, or otherwise pre-type a message that you want to send later because you know that you will be busy. There are plenty of apps available for Android which can take care of this for you, and they all offer a different idea as to how scheduling should be implemented. No matter if you want the feature integrated into a full SMS app or if you want it to be a standalone app, we’ve got you covered.


You can schedule to send sms at any time in the future as you please. It is an SMS Scheduler with beautiful UI !
Main features:
* Use android alarm instead of service to spare battery life
* Send multiple parts messages is ok ( > 160 chars)
* Auto complete contacts selector
* Save sent message to stock sms app
* Notification & sound on message delivery
* Beautiful UI: beautiful widgets & swipe-n-delete finger gesture
Available in 7 languages: Vietnamese, English, French, Polish, Russian, Slovenian, Serbian. If you need it in your language, just drop me a mail, we can work it out.
This app is open-source, feel free to use the source code ;)

Saturday, 20 August 2016

Reliance Jio – Now Preview Offer Available For All Samsung and LG 4G Smartphones

MyJio brings to you the “Jio Preview Offer” now available on all Samsung and  LG LTE / VOLTE phones. As you know you get 90 days Free and Unlimited  4G , Voice Call, Video call, SMS everything under the Preview offer. Previously it ws available for selested phones but now this is available for all 4G enabled Samsung Smartphones.

STEPS TO GET Jio Sim With Preview Offer:-


  • Install My Jio App From Here
  • Now open the app and Install all the rest 10 Jio Apps
  • Turn off your data connection or wifi
  • Open the my jio app. It will show no connection.
  • Now turn on the data or wifi connection
  • You will see Get Jio Sim option
  • Click on it and enter all detaila to get the bar code.
  • Take it to Jio Digital Store along with the Original phone bill and a Zerox , Your ID card and a passport size picture
  • Show them and get your jio Sim.

Thursday, 4 August 2016

How To Track Your Android Phone Without Any App

How To Track Your Android Phone Without Any App

Step 1. First of all, using your android device navigate to security settings > device administrator.

Step 2. Now tap on Android Device Manager and activate if it is off.

Note: I suggest to do this step right now because device administrator must be activated to take advantage of Android device manager.

Step 3. Now go to Google Play Store. You can find Gear icon at right side top. Now Click on Gear icon then you can find three options My Order, Settings and then last Android device manager. Just click on Android revise manager.

Step 4. As soon as you click on android device manager it will find the device with which it is associated.

Step 5. As soon as Android device manager find your device it will show you on Google maps. It will also indicate how far is your distance from you.

Note: 
location on & device connected to the internet which u are tracking

In step 3 sing in that gmail a/c which have on that device

Thursday, 30 June 2016

How To Find and Delete Duplicates Files In Android

For android users, we are here with How To Find and Delete Duplicates Files In Android. Today in this tech world we copy and paste lots of files and folder in our smartphones and sometimes we copy some of the files in our android that already exists in our device storage in another directory. For example, if we have any duplicate movie in our android then it is wasting around 1-2 GB memory space. So better is to remove the duplicate files to save lots of memory. However, you might not kno that where exactly these files are located to delete them. So we are here to resolve this issue with trick for finding duplicate files and removing them easily. So have a look on complete guide below to proceed.
Features Of The Duplicate Media Remover App

With this app you can scan out selective folders to remove duplicate folders.
You will get notified about each and every file that is found while scanning files.
After scanning, you can select the files to delete that is either original files or duplicate file.
You can also schedule scans in this app for you android.

Steps To Remove Duplicate Files On Android

Step 1. First of all download and install the cool app Duplicate Media Remover in your android. Now launch the app and it will ask you to choose folders


Step 2. Now you need to wait for few seconds untill it finishes scanning for duplicate files.


Step 3. Now when the scan get completed you can see all the duplicate files scanned out there. Now you need to click on “Show Duplicates”


Step 4. There you can see all your duplicate media files listed


That’s it! you are done, now you can select your duplicate file to delete it you can also delete multiple files with the help of these.


So above is all about How To Find & Delete Duplicates Files in Android. With this method, you will be able to scan out all the files and folders of your android storage for the files that are duplicate in it and after that, you can easily select them all at once and remove them permanently from your android device. Hope you like our work, do share it with others too. Leave a comment below if you have any related queries with this.

Thursday, 23 June 2016

Trick to Reduce High Data Consumption on Android Smartphones

data is being consumed in background in android system, well see you know that every app or mainly many of those has a ability to interact with internet to receive / send some or the other data, you might be not knowing that while installing any of the app weather you have install online from Google play store or downloaded offline you are the one who grants permission to send/receive data.
These were the common reasons of background data usage now moving ahead let’s talk about solving this issue, its simple to stop restrict background data just follow the simple steps below.

For your reference we have added screens below :


  • Navigate to : Settings -> Data Usage -> Press menu and check (tick) on Restrict background data.


That’s it after doing this you will be getting small triangle over your notification panel just ignore while you have restricted your data, if you click on that your restricted data will be auto enable, its pretty annoying having a triangle with an exclamation mark anyways you have to keep that to save your data balance.

Here are the screenshots how to restrict you background data consumption :


Many of the things has one or the others advantages and disadvantages this process all has its own let’s discuss about one by one.

Advantages :
- Save lots of data.
- Helpful when you are browsing, generally you experience fast browsing speed.

Disadvantages :
- Notification from Apps like WhatsApp,Twitter, Facebook etc are not allowed while you have a enable data restriction.
- Won't access to Play store requires background data.

Saturday, 18 June 2016

2016 Best Hacking Apps for Android Phones

The world is full of smartphones these days. Most people rely on their smartphones and other portable devices to carry out their day to day activities. It won’t be an exaggeration to say that smartphones have taken over laptops in terms of productivity. Thus, it becomes extremely important to know about the (ethical) hacking tools available on your android phone. Who knows, you might need them one day!


Hacking, nowadays, is not something which is the exclusive domain of the “experts”. With the help of a few applications and basic knowledge of the true capabilities of your android phone, you, too, could delve into the world of hacking. So, let’s discuss some of the apps for your android phones which will turn you into a hacker!

1. ANDRORAT

AndroRat stands for Android Remote Administration Tool. As the name suggests, it is a remote administration tool which is used to control another device even if you have no physical access to that device! Manipulating other devices can be easily done using the app which is quite useful in case you’re away from your device and need it to perform some task. It is also useful in inducing some giggle and amazement amongst your friends and family members!

2. DROIDSHEEP

The word “hacking” for many is hacking into your friend’s social media account for giggles. Or it may be used for even something useful like extracting some important information from someone’s social media accounts. DroidSheep does the job for you. It hijacks the sessions of social media activities carried out on your network. You need the knowledge of the basics of hijacking and by installing the app on your android device you’re all set to ‘hack’ your friend’s online social life!

3. KILL WIFI

This open source ethical hacking app is one of the most popular ones in this field. Similar to the net cut app in Windows, this app is capable of cutting off anyone’s WiFi over your network. Kill Wifi is extremely useful when you have an open WiFi not protected by a strong password. You can cut off the WiFi of the intruder by just a few clicks on your device. This app is easy to use owing to its lucid and interactive interface and easy-to-use tools.

4. SPOOFAPP

Won’t it be wonderful if you could place a call to your friend phone, but instead of showing your phone number different number flashes on your friend’s phone?SpoofApp is exactly what this app does. Apart from changing your phone number, this app can also change your voice and record your entire conversation! However, you will need SpoofCards to use this app. Overall a nice app for bringing smiles on your and your friend’s face.

5. WIFI MAC CHANGER

One of the most useful ones, Wifi Mac Changer app changes the MAC address of your device you make your activities almost untraceable. With your rooted android phone, you can change the MAC Address of your device temporarily so that your online activities cannot be traced back to you. The app provides you two methods of changing your MAC Address. One is the easier way which reflects no change in your WiFi settings. The other method is a bit tougher which allows you to enter apps which are password protected and this will reflect the changed address in your WiFi settings.

CONCLUSION

These apps may not seem very productive at a first glance but with prolonged use, you will certainly realize the potential that these apps possess. Who knows someday you may need to spy upon your friend’s/significant other’s social media account? Or you may need to kick off an intruder from your network. Thus, gear up for the path untraveled and watch your world in an entirely different light using these apps!

Sunday, 5 June 2016

How To View Saved Wifi Passwords In Android (2 Methods)

Android device is very smart and intelligent. You may have saved lots of password on your android device. Actually, all these passwords get saved in the internal reserved memory of an android device. Especially, if you are having multiple WiFi connections, then it’s pretty common to forget wifi Passwords. So we are going to share two methods, one is for rooted and another one for non-rooted android devices that will help you get back your forgotten Wifi passwords


#1 Method: Using ES File Explorer

Step 1. First of all, you need a file explorer that gives you the read access to the root folder. If your default File manager doesn’t give you the read access to the root folder then you can install ES file Explorer which will grant superuser premission to you the access to the system folder

Step 1. Go to data/misc/wifi folder and you will find a file named wpa_supplicant.conf.


Step 2. Open the file and make sure you use ES File Explorer ‘s built-in text/HTML viewer for the task. Now in this file, you will be able to see the network SSID and their passwords next to it.


Now note down the network name and its password. In this way, you will be able to view all saved wifi password on the android device.

Note: Please do not edit anything in wpa_supplicant.conf as it can alter your device working or it will have the effect on your wifi connectivity.

#2 Method: Using Wifi Password Recovery(Root)

Wifi Password Recovery is the free tool that requires root access to recover saved passwords in your Android smartphone. You can use this tool to backup all your wifi passwords on your device

Wifi Password Recovery Features

LIST, BACKUP & RESTORE all network’s (WiFi) password saved on your device!
Show SSID and Password on fullscreen (for easy viewing and sharing with others)
Copy WiFi Password to Clipboard (to be able to paste anywhere)
Show QR Code (to another device scan and access the network)
Share password through SMS or Email
How To Use Wifi Password Recovery?

Step 1. You need to download Wifi Password Recovery App on your rooted android smartphone.


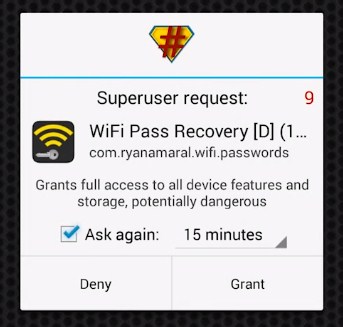
Step 2. After you installed it you need to grant the Root Permissions.


Step 3. Now you can see all your saved wifi password listed with SSID Name and Pass. If you want to copy the password simply tap on the network and then select “Copy password to clipboard“


That’s it you are done! this is the easiest way to know saved wifi passwords in your android smartphone.

There are many apps in Play Store which can perform the same work, but Wifi Password Recovery is the best one because it is easy to use. If you face any problem or need help at any steps please comment below. Don’t forget to share it with your friends too.

Friday, 27 May 2016

How to Kill your Friends or Neighbor’s WiFi Connection With WiFi Kill app

After some Time, we are back again with a new trick for Android, in which you can kill your friends or neighbor’s wifi connection, they will still connect to the wifi but they will not able to Browse or download anything. Then you can make some more fun by telling that wifi is working in your Phone.

Requirements Before using this app :

> Rooted Android Phone (Most Important) –
> Android Version Must be 4.x+
> WiFi kill app – Download Link Below
> Unknown Sources must be enabled. go-to Settings – Security – Tick on Unknown Sources.
> Wi-Fi Must be Connected in your Phone, which WiFi connection you want to Kill.

How to Kill your Friends or Neighbor’s WiFi Connection With WiFi Kill app 

✰ At First, you have to Download – wifikill app for rooted android
✰ Now Launch WiFi Kill app from your App Drawer, it will ask you for Root Permissions, Simply tap on Grant Button. if your phone is not rooted properly, then this app will show you fail message, now after Give root Permissions Successfully now Click on “▻” Symbol which you will see at top of the app, This Symbol is made like play button.

✰ Then It will Start Scanning & Will Take some time & you have to Wait some time, it will take approx 1 minute to scan your WiFi fully.
✰ After Scan Success , It will show you IP Address of Modem Like – “192.169.0.101” in my case, it may be different in your case, don’t worry.

✰ Click on IP Address & It will open a new window from here, Now Click on “Grab” Button, After that Click on “Kill” Button.

✰ That’s all you are done, now your friends will not able to use WiFi connection, They will still connect to WiFi but they will get speed like 0 Kbps & Can’t able to browse or download anything.

For Revert Back 

✰ Untick on “Grab All” Button, After that Click on “Kill” Button
✰ Then Go-to Main Screen Of app & Click on “❚❚” Symbol Normally
✰ Now Your friends , Neighbors can use WiFi Normally as before they was using this.

Monday, 9 May 2016

hack WPA/wps type network WiFi using app( working rooted+ non rooted)

Introducing WiFi wps wpa tester Premium !!!
After the success of "Wifi wps wpa tester"
comes the Premium version!
- NO ADVERTISING '
- OPTION COPY PASSWORD
- REVOLUTIONISED THE MENU '"SHOW
PASSWORD"

Try if your wireless network is secure or not!
thanks to this app and thanks to the
algorithm of wps default (zaochensung)
SOME of routers, you can receive the WPA
WPA2 WEP set to the router.
*************************************
The app needs permission superuser (root),
otherwise it displays only the default WPS.
Algorithms used:
-Zhao
-vodafone arcadyan
- Added default pin of many routers
APPLICATION USE ONLY WITH ROUTER
PROPERTY FOR ITS NOT GOING AGAINST
THE LAW.
-------------------------------------------------------
How to use
1.Open app and press refresh 
2.Then the list of WiFi networks available will be shown.
3.If you see a green Lock Icon click on it
4.Press Try to Connect automatic pin
5.In seconds a pop up will appear with success


List of Most Vulnerable routers

  • iBall Baton
  • TP Link
  • MBlaze
  • And many more
  • Recommended to use on high signal
  • -60 or less

Click here to download the App

TRICK TO CREATE UNLIMITED EMAIL ADDRESS USING INSTANT EMAIL ADDRESS APP

Instant Email Address, a great app to generate unlimited email address within a second. You do not have to fill any lengthy form and no need to provide your personal info. Nowadays Email address is vital thing to create new account on various websites so here is an awesome way via which you can generate unlimited email address. Follow below mentioned few simple steps and grab this awesome way.

Steps To Follow : 

1. Download Instant Email Address app from Here . 

2. Once you download, open it [ No verification or registration required ].

3. Now you can see few email address already created for you.

4. Click on "Random address generation" to generate more email address.

* Click multiple times to generate more email address.

5. You can also customize your account email address from "Specify account name" section.

6. Now you can send or receive unlimited emails and generate new mail address using this app.

Thank you for visiting 

Saturday, 30 April 2016

Send money to all India any account without any charge.

Use State Bank Buddy and have the freedom to send money to Anyone, pay bills, recharge mobile/ DTH, book movie/ flight/bus tickets 24x7 on the move. Anytime Anywhere!!!


Step To follow:

    Download State Bank Buddy app
     -Android | iOS

    Proceed Signing up for a new accountsign-up

    Enter all the required details asked.

    Verify your Once Mobile & Set a Pin for your account.
  • Add money to your wallet by using your debit card or net banking or IMPS.
  • Go to menu list select transfer to Bank
  • Put Account details which account you want to sent money.
  • Send & enter pin to complete Process.
  • enjoy u have done :)


Note: 2000 rs at a time sending limit. next transition after 20 min.

All you need:

A smartphone with Android  System (Version 3.0 or above)

Access to Internet data services either through wireless facility or 4G/3G/GPRS/Edge.

Fees and Charges

Currently, there are no charges for using State Bank Buddy mobile application. You will only have to pay the operator charges for the data connectivity.

Monday, 18 April 2016

Install A Custom Android Boot Animation

Here we are going to discuss the two different possible methods that will help you to change the boot animation of you android device. So have a look on both the method discussed below to proceed.


#1 Manually Using Android File Manager

1.First of all the main requirement of this step is that your device must have root access.Root access will be required in the file manager of your device that should have root grant for further procedure so firstly Root your device.

2.If your device is rooted then you can now download a custom boot animation from the network.Then save the animation file on your device.

3. Now you has to open the Root Browser (or your file manager) app on your phone and then you has to locate your original boot animation file (bootanimation.zip) in /system/media.This is the boot animation that you see by default on your phone.Long press the file to select it, then rename this file to bootanimation.zip1.

4. After renaming the file, browse the custom boot animation file that you has downloaded before and saved to your device. Now copy this zip file to /system/media. Long-press the file in the root browser and then choose the Permission option.

5. Just select all the options from the menu that will appear and then click ok. After that, rename the file to bootanimation.zip.The file should be renamed correctly as this file could not be recognised by the system if the name is different and your device may not boot properly.
6. Now you should be able to see two zip files, one, bootanimation.zip (new file) and the other is bootanimation.zip1 (original).

7. If you would ever like to switch back to your original boot animation then you can delete the current bootanimation.zip file and rename the original file back to bootanimation.zip (from bootanimation.zip1).

8. At last just reboot your device and you will see that your default boot animation has changed.

#2 Using Boot Animation App

1. In this step also you should have the root access on your device unless you cannot do the changes. If your device is rooted you can then download the boot animation for your device and then store it in the device.

2. After that you has to now download the Boot animations root app.By using this app you can easily change the boot animation.
3. Just open the app and then choose Backup/Restore through the menu options. You should now backup your original boot animation by tapping the Backup option in the app.

4. After creating the backup of the default boot animation file,just locate your custom boot animation file in the storage of your device. Long-press the zip file i.e the boot animation file and then choose Install option.File names should be renamed to “bootanimation.zip” before proceeding to the installation process.

5. The app will then automatically install the new boot animation and then you can reboot your device to see your new custom boot animation.


Here in this article you has now learned two different ways to change the boot animation of your android.Using these methods you can now change the boot animations to your wish.Just try these steps on your android smartphone and you shall make your phone look more awsome than before while booting.

Friday, 8 April 2016

Add Recycle Bin Feature On Android Phone [ Without Root ]

Dumpster is available on Play store from which if you accidentally delete your file or any application, Dumpster saves it, and whenever you have to restore that deleted file you can easily restore it by opening the application this is very simple and easy trick and no need to root your device as well as Xposed module too. Now whenever your file has been deleted you can get it easily by opening the application. You can add all the file format such as image, Video, music, documents, compressed etc.


Features of Dumpster

Restore deleted files almost all the formats
• No Root required
• No internet connection required
• Recover uninstalled application
• Restore files with single tap
• Preview Deleted files and folders
• Share files into Dumpster by clicking on share button
• Scheduled auto clean to delete all data after specific date
• Protect your privacy with special lock on application


How To Add Recycle Bin On Your Android

1: Firstly download the application from here – Dumpster

2: Open the application and click on I Agree
3: Now, select the data which you want to store in the application.
4: Now, the application is ready whenever you will delete any file it will automatically appear on the dumpster.

Sunday, 27 March 2016

find IMEI Number of your lost android mobile

Today I’m going to show you how to find out the IMEI Number of Your Lost Android device. To Know the IMEI number, there are certain steps which you need to follow. Just Follow the below steps to track the lost Android and get the IMEI number and find out the person who has stolen the Android device and what is his/her current location. It is very easy to find IMEI Number of your lost android mobile. Just be with me and follow the steps.
Follow These Steps:-

1. First you need to open your internet browser on your computer or you mobile

2. Now visit this website: Google Dashboard


3. Login with your google account that you used in your android device

4. Now choose the android option in Google Dashboard

5. Here you will see the total information of IMEI, model number and others related to your device

6. Just note down the IMEI number of your lost android mobile from tracking

7. Thats it. You are done with the process of recovering lost IMEI number of android mobile

Thursday, 24 March 2016

Run Multiple Accounts Of Same App In Single Device [ No Root Required ]

an awesome trick as well via which you can use Multiple accounts of same app in single device and amazing part of this trick is, you do not need to root your phone. I am sure you guys have multiple Facebook, WhatsApp, etc account and you are using multiple devices for the same as well, but now you can use all those multiple accounts in single device by following below given steps so lets proceed and check out this awesome app named as Parallel Space which allows us to multiple accounts in same device.

Trying to login to multiple Facebook or Instagram accounts at the same time? Here’s the revolutionary tech for you. Parallel Space is an unique app which allows you to sign in two different Facebook accounts simultaneously on a single Android device.

Steps To Follow : 

1. Download Parallel Space from Here .

2. Now install and proceed to App Dashboard.

3. After successful installation, you can see "+" Button, just click on it.

4. Now add any app which you want to use multiple accounts.


* You can use all well known apps like Facebook, WhatsApp, Clash Of Clans, and many more apps.


So enjoy this superb app and keep sharing this post with friends so that all can enjoy this awesome way to run Multiple accounts of same app in single device.


Wednesday, 16 March 2016

free calls to any Mobile/Landine Phone Using POPTOX


Make Free Internet Calls to Mobile & Landline Phones.

With PopTox, you can make free internet calls from your PC or Mac. You can use PopTox from any standard web browser. You do not need to download any app or plug-in. Absolutely no payment is required. Simply enter the phone number and click on the “Call” button to start your first free call. Make entirely free internet calls to your loved ones today!

Mobile or Phone Service is not needed

No Need to download IOS app

No Need to download Android app

Excellent call quality - truly!


Steps to make free call:-

To Begin making the free call just head to the site POPTOX,on right hand side you will see a ‘Mobile phone’ along with the number keys,from the drop down select a country and input 10 digit number from the dial pad shown,after you input the number Click on the ‘Call’ button,allow Mic permission and you will see on the screen ‘Phone ringing’,the call will get connected as soon as the other party answers you call,the call duration will be for a limited time only,you can re-call the same number once your call gets disconnected.


Additional details:-


  • Calling is supported on With Google Chrome and Opera Browsers,The call duration will be only for a limited time7 duration,Their is also a limited for number of free calls that can be made in a day,No need to download any app,Perform signup or Provide any payment info to make a free call,‘Mic’ is required on your PC to initiate and make the free call.

Tuesday, 1 March 2016

How to Root Any Android Device 2016

Android rooting is the process of allowing users of Android Phones, tablets, and other devices running the Android mobile operating system to get the full control and authority within Android’s system. When you root an Android smartphone it enables you to act as the administrator of the android phone. Rooting of Android provides you the facility to completely remove and replace your device’s operating system.

Rooting Not only increase you Battery life & Performance, but also Provides you option to unofficially Upgrade your Current Android version. There are many benefits of rooting your phone like:

Boost your Phone speed & Battery Life.Remove Pre installed crap ware like System Apps.Remove Bloatwares, Apps like Facebook, Chrome Keep sucking your Ram & battery by running in background So, Among the smartphone geek crowd, applications like these are referred to as “bloatware:” they do nothing but bloat the software by existing as unnecessary applications.Tweak your phone like : Increase Video streaming speed, Increase Wifi Speed, Increase SIM detecting Speed, Increase SD read/write speed.Most Important & Best part, Install Custom Kernel & Custom ROMS ( I will explain about it in Installing Custom ROM section Custom ROM section )Finally, Truly Own your Device, Make it appear in the way you want.

How to Root Any Android Device 2016

Note:

No data loss process: Your Android phone data like contacts, pictures, video etc will not be affected.Warranty Void: Your Android Device warranty may get void after following the below tutorial.How to Unroot: To unroot your device, Open Kinguser on your device > Settings> Remove Root permission.

#1 Method – Using Kingo ROOT


Kingo ROOT is One – Click Root Designed to work on Windows Computer . It helps to root any Android Smartphones in single click which has a success rate of 80-90%. This is the best Android rooting software through PC available in market. This is the only one click root app which has tones of developers working on it to bring improvements and to increase the device limit in every update which are released frequently.

Success Rate: 90-95% (Success rate is the rate of how many device this App is able to root which are available in market.)

Precaution: If you are using any Antivirus Application on your Computer, then disable it first then follow the tutorial.

ROOTING process:

Enable USB Debugging Mode on your Android smartphone. To enable USB debugging. Go to Settings > Developer Option > USB debugging > Tick to Enable. Developer Option is Hidden for Android 4.2.2 & Above, to show this option Go to Settings > About phone > Built Number ( Tap on it 7 times until it shows you are now a Developer.)

Download Kingo Root Windows Application and install it normally in your Windows PC.Once you have Installed Kingo Root App in your Windows PC, you will see a windows similar to this.

Once your Smartphone is connected successfully to the Computer (Enabling USB Debugging), Kingo Root will Automatically detect your device.Now, Click on ‘Root’ Button to begin the rooting process.


now Kingo Root will Automatically Root your phone and install SuperSU.Now your Android Device is rooted, To confirm Check for a App named ‘SuperSU’ on your phone. Congratulations, you have successfully Rooted your Android Smartphone. I hope this guide helped in rooting your phone.Check if you are successfully rooted by downloading and installing Root Checker App from Play Store.

If Kingo Root was unable to detect or ROOT your device you can use other One click Root Apps mentioned below.

#2 Method –  VRoot


Vroot’s goal is providing the excellent and simplest experience for all android users. The newest version of Vroot have supported for more than 8000 kinds of Android devices. It is more effective, easier and faster than you can imagine.

Success Rate: 70-75%

Download the VRoot App for Windows PC.Install it. Just click Next and Launch it.Connect your android device and make sure that USB Debugging mode is enabled from Settings > Developer Options.From VRoot on your PC, click Root.Wait for the result. If it’s a success, your device will reboot and you can now disconnect your android device from your PC.Check if you are successfully rooted by downloading and installing Root Checker App from Play Store.Done!

#3 Method – Using Root Genius


Root genius is the best & easy-to-use rooting software with high success rate for Mediatek devices. Root Genius is a Windows Application. There are less chances of this rooting your phone properly.

Download and Install Root genius for Windows.Run Root genius Android Root as administrator and connect your Android device to your PC via USB cable. Wait for the drivers to completely load.Enable USB Debugging mode fromSettings > Developer options
from your android device. Just follow the instructions shown on the Root genius based to your Android version. Carefully read the notifications
before continuing.Click ROOT to begin the rooting process. It could take 2 up to 3 minutes for the
rooting process to be completed. (Don’t unplug the USB cable).When done, click Finish and it will reboot your phone.Check if you are successfully rooted by downloading and installing Root Checker app from Play Store.

#4 Method – Using Unlock Root


Unlock Root roots and unlocks the boot-loader of various android devices. They have their own way of rooting and unlocking. To use this method for you to root your phone, they have their guides provided on each android device. Just visit Unlock Root and follow their own guides for your device.

I Hope this tutorial helped you in rooting your Android Smartphone. Though it has many advantages but rooting an Android Smartphone without following proper instructions can be risky. But with this such application’s you can easily root your device and can have much out of it as it will speed up your Android’s performance, access hundreds of new and exciting features and increase its battery life, and . And Rooting an Android device is totally safe and best thing you and your device can have !

Thursday, 25 February 2016

Run Android Apps In Chrome Browser(run WhatsApp in PC)

We are going to explore the trick to Run your Favorite android Apps in your Google Chrome browser. Go through the full post to discover more about it.
Today there are numerous users who want to experience all the android apps on their PC and there are multiple emulators that are accessible on the internet which is determined to run the android app on PC.


But the significant difficulty with theseemulators is their slow speed and monotonous look. So in this post, I will tell you the reliable way to run android app on your Google Chrome Browser, The process by which you can manage apps with high speed and conventionally. By this, you can appreciate all your android experience in your favorite google chrome browser.

How To Run Your Favorite Android Apps In Google Chrome

This method is very simple and straightforward that you enjoy all yourandroid app experience on your computer screen. This program mainly works with a cool plugin named ARC Welder. This is a type of emulator that practically allow you google chrome browser to run apk files on it. Just follow the below steps to proceed.


Steps to run apk on google chrome

1. First of all download and install the latest version of Google Chrome Browser. Now sign in with your google account in your browser and goto web store and downloadARC Welder.


2. Now download the apk you want to run in your google chrome, you can download it anywhere from the third party source like APKMirror or APKLeecher etc.


3. Now you will see Arc Welder app at the left corner of your browser named as apps.


4. Now click on the Add your apk and add your download apk there and also you can set the familiarization of the app to be viewed.


That’s it! you are done, now you can run any apk files in your google chrome browser.


So preceding is the method for Running Android Apps In Chrome Browser. By this process you can easily operate all your favorite apps like WhatsApp and all other apps like games in your google chrome with the better speed and administration and there is no requirement for any emulator. Hope you like the post, Don’t forget to share with your friends.